How to Use a Band Saw
Do want to learn about using your band saw? Everyone can understand how to cut simple curves with a band saw. However, these tips from experts can make everything simple.
How to Use Band Saw
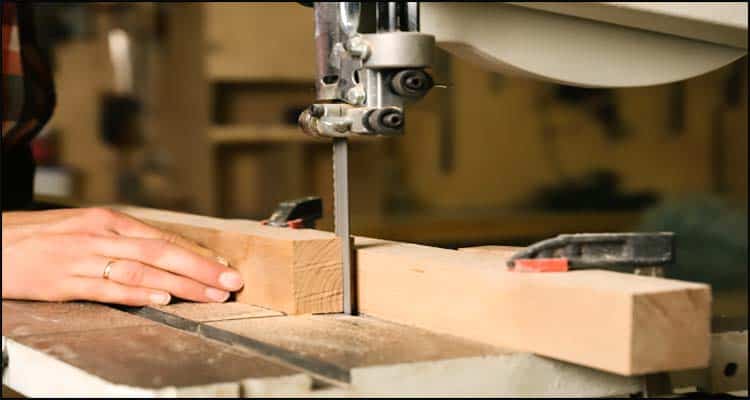
A band saw consists of a steel band with a jagged edge that rotates around two huge wheels. It is an absolute necessity to have a device for every talented carpenter. Importantly, band saws can cut curves and shapes in wood. More so, they can even be used to cut various materials such as metal.
Saw preparation
If you’re wondering how to use band saws, it’s not as difficult as you might think. How you use one and what difficulties come with it depends on the task.
Before using your band saw, make sure that it is properly balanced. Bearings for the best possible change can be found in the instruction manual.
Select the correct band saw blade
You should select and install the correct band saw blade before making cuts. As with the jigsaw, there is a whole range of blades that are suitable for different types of materials and cuts.
A band saw usually accompanies a single saw blade. However, there are many different types of saw blades available for different applications. The blades differ in the number of teeth per inch. Also, differ in the geometry of the teeth and necks in the middle.
These differences allow you to make different cuts depending on the material and condition of the intended cut.
In order to achieve a fruitful, cut and solve your problems, the right blade must be installed. Different cuts can include rip, curve or straight
These different circumstances require that a different saw blade be placed on the band saw. You must eject the blade fully to install another one.
The essentially expressed installation process is to put the new blade on the two wheels, one on top and one on the bottom.
- You then press the blade slightly and concentrate the blade on the wheels.
- Once the blade is moderately focused, increase the load on the blade at this point until this pressure is correct.
- The correct load for a band saw blade should be to move the saw blade slightly sideways with a single finger without your finger becoming white.
Take your measurements
There is a well-known saying in development and woodworking: “Measure twice. Cut once.” You’d rather not hurry up by measuring your wood and cuts. In this case, you may have to try the company again while wasting a lot of wood and cash.
It is far from difficult to take the measurements, so delay and take as much time as necessary, regardless of whether it seems routine. Your measurements are important with the aim of getting the cut in the right area.
The average band saw cuts are either a crack along the length of the wood or a cross-section that extends across the shorter dimension of the wood. Make sure you take the type of cut into account when making and printing your measurements
Position the bearings
After installing the blade, setting the correct pressure, and taking your measurements, you need to position the bearings at this point. There are three bearings above and below the table.
There are three bearings: one on the left side of the blade, one on the right side of the blade, and one behind it.
You need to adjust these bearings so that they are exceptionally close to the blade but do not touch. The motivation behind the bearing is to protect the blade from excessive deflection, either to one side, to one side, or to the back of the bands.
Adjust the height of the top guide assembly
Band saws have a guide that can be moved vertically and encompasses the saw blade. The blade goes through this guide.
You need to position the top guide vertically in the correct position compared to the material you are cutting. The idea is to bring the guide assembly as close to the wood as possible without affecting the cut. This helps with cutting because the band saw blade cannot be deflected excessively to one side or to the privilege.
Make your rip cut
If you cut a piece of wood along the length of the material, it is called a rip cut. You tear by placing the wood (or the material you use) against a fence that stumbles from front to back into the band saw table. This fence moves left or right and can be positioned in a certain way from the blade.
Make your cross cut
In cross-cutting, the material is cut over the smaller or short side. These cuts can be controlled on the band saw in two different ways. First, it is usually straightforward and safe enough to use your hands. In this situation, slide the wood out through the blade, hold the blade on your guess line, and keep your hands away from the moving blade on both sides.
A more precise and basic strategy is to do a miter check. Band saws have a miter check dado on the table for an estimated miter measure, similar to what you may have with a table saw.
Your material fits into this test and lies on the surface opposite the blade. Place the wood or material against the opposite miter surface and align the mark on the wood with the blade. Carry out this arrangement with the saw NOT running. Turn on the saw. Push the wood with the miter dimension through the cut and separate the wood into two parts
Read more: Best Band Saw for Woodworking
Conclusion
Since you know the basics of using band saws, you should decide what type of band saw you want to use. You also need to determine the size and scope of your business.


